Yesterday, my blog used the Google Site Search for delivering search results for this blog. In this article, I show you how I used Azure Search to add an epic, search-as-you-type search for all of my blog posts.
Motivation
If you used the search on this blog in the top right, you were directed to google site search, clicked hopefully on a hit and went back to my blog. From analytics, I knew that this is used more frequently than I thought - and I used it, too.
But: I was not very happy with it for some reasons:
- I do not have control over what is in the index. Neither timing- nor quality-wise
- I cannot control the design
- The user leaves my blog and then comes back
Given the static nature of this blog, I could not simply hack some SQL queries together and pretend to have a search - I wanted “search-as-a-service” that I can put in the top right and just works. So I decided to use Azure Search as a search service - and the result blew me away! It is sooooo simple to get started - and surprisingly, it’s free!
To get going, I needed to do 3 steps:
- Prepare the data
- Feed them to Azure Search
- Create a search box and connect it to Azure Search
Prepare the data - Hugo JSON Feed
Some background: my blog is hosted on Azure Storage with Static Website feature enabled. Hugo generates pure HTML files upfront, they are then stored on the storage. No high-level runtime stuff available like PHP or ASP.net.
That’s why I first tried to index the entire blog with Azure Search (more about how I did this later) to see if the fields that add value, are indexed. They are:
- Full-text content
- Summary
- Title
- Date
- Url
- Picture
- Tags & Categories
Indexing all the HTML files on the storage account gave me the following search results:

Full-text of the entire page including the header and navigation is there, URL and Title could be added - but that’s pretty much it. For 1-minute effort actually not too bad. But of course, I wanted a better solution. I checked what Hugo has in the box for this and quickly discovered JSON Feeds as an output format. I followed this great article by Raymond Camden and added the following to my site configuration (config.toml):
|
|
In line 8 I configured that the output format JSON should be generated additionally to HTML and RSS. In line 1 I specified the JSON output further. Line 3 and 4 specifies where the JSON file is being placed, in my case /feed/feed.json (you can open that file, too).
After that I created a template file to specify the contents of the json feed. I therefore created a file called home.json in the \layouts_default folder of my theme:
|
|
In line 2 I iterate over all my blog posts. And from line 5-15 I export all the fields that I want to have available in the search index. You can even add logic to the output with the GO template language (line 12); I noticed that I had blog posts with no images so I added a placeholder there.
That gives me a beautiful json file:
So we are set for indexing. No further manual step required once I craft a new post or update an existing one. Awesome.
Azure Search
I created the Azure Search service directly in the portal and the process is pretty much straight forward:

Next up, I clicked on “Import data” to create an index:

The important field here is “Parsing mode” - the JSON Feed we created above exports as JSON array, so select that. In the next dialog you can further optimize the extraction and add all kinds of cognitive service fields to your hits (people names, org names, etc. ), I skipped that for now.
After that you can customize the fields of the index:
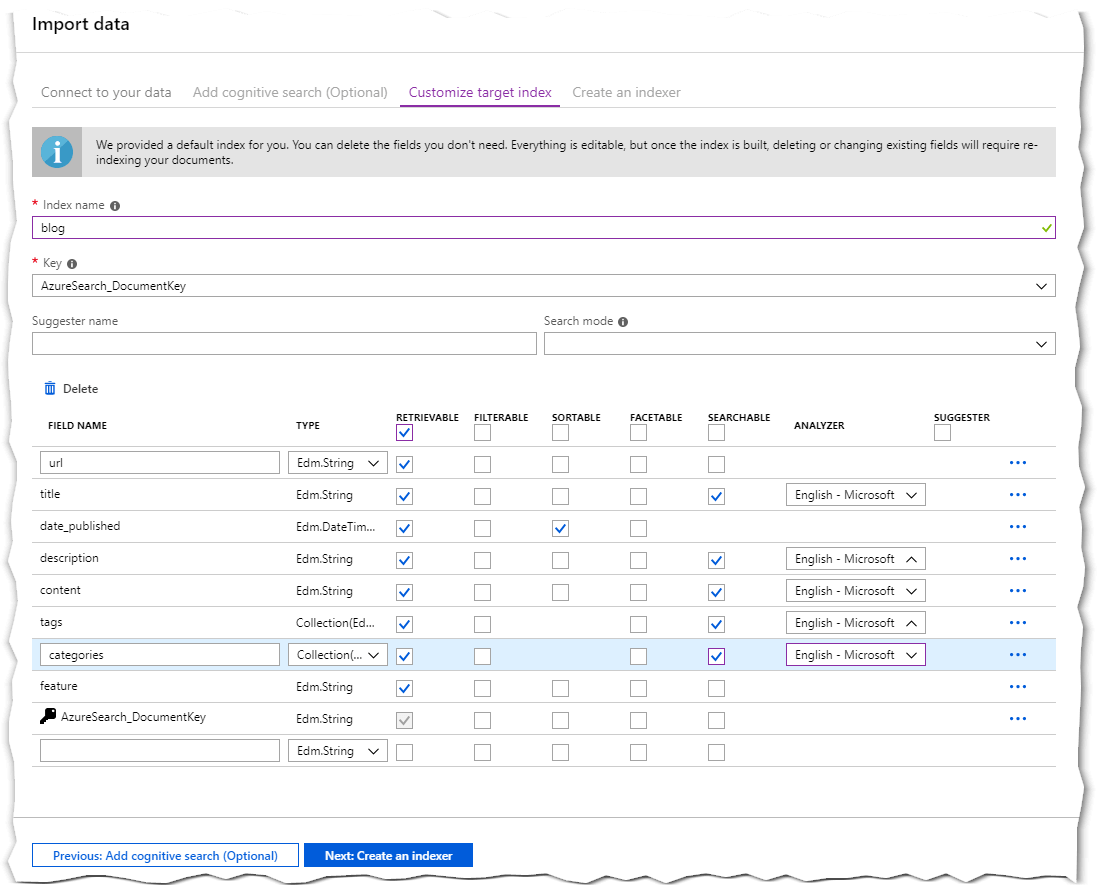
I removed all storage metadata and made all fields retrievable. The fields that have valuable fields, I made searchable and changed the Analyzer to “English - Microsoft”. My content is in English and I heard good things about the indexer that Microsoft maintains.
Lastly I set the indexer to “once”:

Immediately after creating the index, the content was already indexed - it’s super fast. For my ~500 pages that are indexed, it took 1.5 seconds.
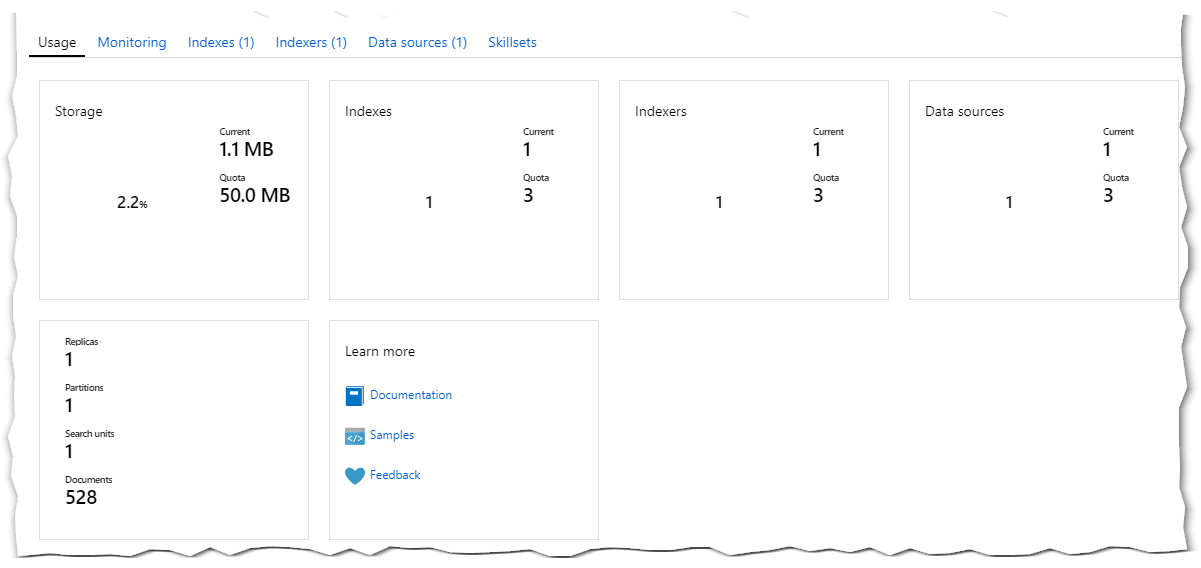
As you can see, I am using only 2.2% of the max index size of the free tier, I can use this service for free for a very long time! Great!
Indexing all of this gives me a REST endpoint that I can use to fire queries against. E.g. https://melcher.search.windows.net/indexes/blog/docs?api-version=2017-11-11&$top=10&search=azure&api-key=291A630E0DAB2D652ECDF845294E793E gives me the top 10 posts that have the keyword azure in it. Pretty straightforward to me.
If you want to consume the search service via REST, you have to allow CORS. The option is “hidden” on the index.

otherwise you will get errors like this:
Access to XMLHttpRequest at ‘https://melcher.search.windows.net/indexes/blog/docs?api-version=2017-11-11&$top=10&search=azure&api-key=291A630E0DAB2D652ECDF845294E793E' from origin ‘http://localhost:1313’ has been blocked by CORS policy: No ‘Access-Control-Allow-Origin’ header is present on the requested resource.
Creating the Search UI
Now comes the tough part for me. I need to build a UI to surface the search results. At first, I looked at a few jQuery widgets that promised autocomplete, search-as-you-type and what not. But actually, that was a lot of pain to make it work so I decided to build a simple UI myself with good old jQuery.
I doubt, that you can just copy&paste my customization directly to your blog - but they hopefully give you an idea how I did it.
Firstly, I added a template rendering library mustache.js to my footer. I need it to dynamically render the search result. Mustache has a pretty flexible template language and you can adjust the delimiter to not interfere with Hugo’s template language.
Then I added the javascript search logic to my main.js:
(function (document) {

	var showSearch = $('.fa-search'); //the search button in the top right
	var closeSearch = $('.closebtn'); //the close button in the overlay

	var template = $("#search-template").html(); //the mustache.js search result template
	Mustache.tags = [ '[[', ']]' ]; //replacing the {{ }} of mustache with [[ ]] - this interferes with hugo's template language otherwise
	Mustache.parse(template); //parse the template

	//attach a click handler to the search icon
	showSearch.on("click", function () {
		$('#overlay').show(); //show the overlay
		$('html, body').css('overflowY', 'hidden'); //remove the outer scroll bar
		$('#searchinput').focus(); //focus the input box
	});

	//attach a click handler to the close icon
	closeSearch.on("click", function () {
		$('#overlay').hide(); //hide the overlay
		$('html, body').css('overflowY', 'auto'); //add the outer scroll bar
	});

	var $search_input = $('#searchinput');

	//attach a keyup handler to the search input box
	//delay the search by 500ms
	$search_input.on('keyup', delay(function (event) {
		search();
	}, 500));

	//the delay function I got from
	//https://stackoverflow.com/questions/1909441/how-to-delay-the-keyup-handler-until-the-user-stops-typing
	function delay(callback, ms) {
		var timer = 0;
		return function () {
			var context = this, args = arguments;
			clearTimeout(timer);
			timer = setTimeout(function () {
				callback.apply(context, args);
			}, ms || 0);
		};
	}

	//the actual search function
	function search() {
		//my api key
		var apikey = "291A630E0DAB2D652ECDF845294E793E";

		//get the search query
		var query = $('#searchinput').val();

		//properly encode it for the URL
		var encodedQuery = encodeURIComponent(query);

    //build the ajax call with the query url and the api key
		$.ajax({
			type: "GET",
			url: "https://melcher.search.windows.net/indexes/blog/docs?api-version=2017-11-11&$top=10&search=" + encodedQuery + "&api-key=" + apikey,
			dataType: "json",
			success: function (data) {

				//clear the old results
				$(".overlay-results").empty();

				//required for the "no results" template
				data.noResults = !data.value || data.value.length < 1;

				//render the search results as html
				var render = Mustache.render(template,data);

				//attach the html
				$(".overlay-results").html(render);
			}
		});
	}
})(document);
It opens an overlay when you click on a button that has the class “fa-search”.
Then I added the following to my header right before the closing </head> node:
<div id="overlay">
<div class="overlay-content">
<span class="closebtn" title="Close">×</span>
<input id="searchinput" type="text" placeholder="Search.." name="search">
</div>
<div class="overlay-results">
</div>
<div class="promo">
Search results provided by <a href="https://azure.microsoft.com/en-us/services/search/" target="_blank">Azure Search</a> - read how I built it <a href="https://melcher.dev/2019/03/azuresearch-and-hugo-free-and-awesome/">in this post</a>.
</div>
</div>
<script id="search-template" type="x-tmpl-mustache">
[[#value]]
<div class="search-result">
<a href="[[ url ]]">
<h1>[[ title ]]</h1>
<div class="feature">
<img src="[[ feature ]]">
</div>
<div class="description">
[[ description ]]
</div>
<div class="clear"></div>
<div class="tags"> [[ #tags ]] #[[.]] [[ /tags]]</div>
<div class="categories"><i class="fa fa-sitemap"> </i> [[ #categories ]] [[.]] [[ /categories]] </div>
</a>
</div>
[[/value]]
[[#noResults]]
<div class="no-results">
<h1>no results :(</h1>
</div>
[[/noResults]]
</script>It defines a block #overlay that has the input box and the close button. Additionally, it adds the mustache.js template that I use to render the results. The [[variable]] placeholders are then replaced with actual values.
And lastly some styles to my main.css:
/* Search */
#overlay {
    height: 100%;
    width: 100%;
    display: none;
    position: fixed;
    z-index: 100000;
    top: 0;
    left: 0;
    right: 0;
    bottom:0;
    background-color: rgb(0, 0, 0);
    background-color: rgba(0, 0, 0, 0.9);
}

.overlay-content {
    width: 100%;
    margin: 4em 0 1em 4em;
    display: inline-block;
}

.overlay-results {
    display: inline-block;
    height: 75%;
    overflow-y: auto;
    margin-left: 4em;
}

.no-results h1
{
    color: white;
}

.promo
{
    margin-left: 4em;
    color: #ccc;
}

.promo a
{
    color: red;
    border-bottom: 1px dashed red;
}

.closebtn {
    position: absolute;
    top: 0px;
    right: 15px;
    font-size: 5em;
    font-weight: bolder;
    cursor: pointer;
    color: red;
    line-height: 60px;
}

#overlay input[type=text] {
    padding: 15px;
    font-size: 17px;
    border: 2px solid red;
    float: left;
    width: 80%;
    background: white;
  }

#overlay input[type=text]:hover {
    background: #f1f1f1;
  }

.search-result .feature img
{
    width: 10%;
    float: left;
}

.search-result h1
{
    color: #ccc;
    margin-top: 5px;
    width: 70%;
}

.search-result .tags
{
    color: red;
    width: 70%
}

.search-result .categories
{
    color: #ccc;
    width: 70%;
    margin-bottom: 1em;
}


.search-result .description
{
    width: 70%;
    float: left;
    margin-left: 1em;
    color: white;
}

.search-result .clear
{
    clear: both;
}
Summary
Ok, that’s it - I have the search that I wanted with all the flexibility that I need “as-a-service”. From an effort perspective, I took me 5 minutes to setup Azure Search. 30 minutes to teach Hugo how to export only the data that I need for search and approximately 2 hours for the UI. 2 hours 35 minutes of my life that I won’t get back - still, great learning expertise and I am a little proud of the output.
Do you like it?

Share this post
Twitter
Facebook
LinkedIn
Email