SharePoint Search Federation is a really underrated feature if you ask me. You can greatly improve your company’s knowledge management and create a single point of entry to all kind of data. Federation comes into play when you can not crawl the data source (too big or too complex).
With SharePoint 2013 and the very cool query templates you have literally thousand of options (to be honest you had them before but with XSLT its not that much fun) to enhance your search results.
Real Time Twitter Search
Lets do a quick example – how about adding Twitter to your search results and style it a bit?
First off, go to Central Admin and click on your with PowerShell provisioned Search Service Application. On the left menu you can see an entry “Result Sources” with 16 default sources defined by SharePoint, compared to SharePoint 2010 that is 4 times more! Most of the SharePoint sources can not be edited but they give you a clue what the intention of this is.
Step 1: Create the federation
If you want to create a search federation you simply need the OpenSearch link. For the twitter example its http://search.twitter.com/search.atom?q={searchTerms}.
Friendly reminder: Your server needs connection to the internet, at least to that site in order to work…
Step 2: Upload a new page layout
When you edit a search page you might notice that there are only two page layouts available, either you go for two columns and that is not that optimal for “side queries”. Or you change it to Web Part page and have the quick launch on the left side. Best chance to try the new design manager and create a 3 column page layout – too many steps for this article, that’s why you can download my hacked version here. Just drop the file SearchWithFederated (right click and save as!) to [\sharepoint2013_catalogs\masterpage][4] (replace sharepoint2013 with the hostname of your server or drop the file to the 15’ folder) – SharePoint 2013 will handle all the rest <— SO COOL!!!
After uploading the page layout, go to site settings of the search center and click on “Page Layouts and Site Templates” and add “SearchWithFederated” to the allowed page layouts:
[ ][5]
][5]
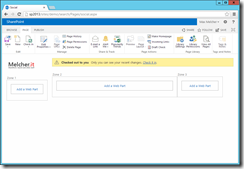
Then create a page and e.g. call it social.aspx with the new page layout “SearchWithFederated”. The page should look like this now (except that you don’t have the cool logo!):
[ ][6]
][6]
Step 3: Add an additional search Web Part to the new zone
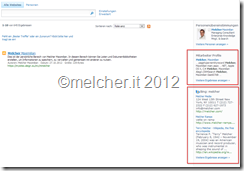
In SharePoint 2010 there was a “federated search Web Part” – its gone, you don’t need it anymore. You could do cool stuff with it, at Alegri we have a federation to Microsoft Dynamic where the employees skills and certificates and stuff are managed, on the screenshot you can see it on the right:
[ ][7]
][7]
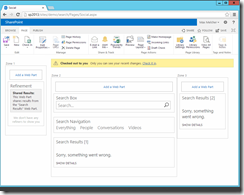
With SharePoint 2013 they built a lot of new search Web Parts and broke with a lot of old stuff – shiny new world! Okay back to the example, just add:
- Refiner Web Part to zone 1
- Search result Web Part to zone 2
- Search navigation Web Part to zone 2
- Search box Web Part to zone 2
- Search result Web Part to zone 3
[ ][8]
][8]
Step 4: Configure everything
Okay, lets start with the search box, that took me a while to notice that you change the connection here:
- Send Queries to Web Parts
- Search results [1] (check)
- Search results [2] (check)
Now edit Search Results 2:
- Click on change query (cool new wizard, love it!)
- Basics
- Select a query: Twitter
- Number of results per page: 5
- Show advanced link: (uncheck)
- Show result count: (uncheck)
- Show paging: (uncheck)
- Show preferences link: (uncheck)
- Settings
- Loading Behavior: Async option (this loads the results after the main results in zone 2 appears and doesn’t wait on the twitter search service)
- Basics
Step 5: First results
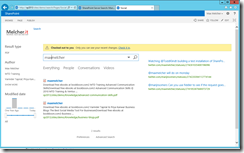
ooookay… very cool stuff:
[ ][9]
][9]
You can click on the results and get redirected to twitter.
Step 6: Adjust the Display Template
So what’s next, we got it working right? Yepp, but how about the author and the date of the tweet? Let’s tackle this with the awesome new display templates – too many steps and it took me a while to figure it out (author is in the xml), just download the file [Item_twitter][10] (right click and save as!) and upload it to [\sharepoint13_catalogs\masterpage\Display][11] Templates\Search (again, replace the hostname)
One thing that really helped me creating the display template was the super debugger in chrome. Just add “debugger;” in the JavaScript part of the template, hit F12 in Chrome to open up the Developer Tools – and you can debug the display template and context object (just hover over it or use the console) – SWEET!
[![]() ][12]
][12]
After uploading the display template, edit the page and set the Item Display Template to “Twitter”. The setting is in the Display Template section of the result Web Part.
Final result
And here comes the very last screenshot of this very long blog post – my longest so far!
[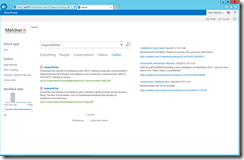 ][13]
][13]
Feedback?
Much appreciated in the comments!
[4]: file://\sharepoint2013_catalogs\masterpage" data-mce-href= [5]: http://melcher.it/wp-content/uploads/sp2013_pagelayouts.png [6]: http://melcher.it/wp-content/uploads/sp2013_3columpagelayout.png [7]: http://melcher.it/wp-content/uploads/federatedsearch_sp2010.png [8]: http://melcher.it/wp-content/uploads/sp2013_federatedsearch1.png [9]: http://melcher.it/wp-content/uploads/sp2013_federatedsearch2.png [10]: http://melcher.it/wp-content/uploads/Item_twitter.html [11]: file://\sharepoint13_catalogs\masterpage\Display [12]: http://melcher.it/wp-content/uploads/sp2013_DisplayTemplate_debugger.png [13]: http://melcher.it/wp-content/uploads/sp2013_federatedsearch_final.png



Share this post
Twitter
Facebook
LinkedIn
Email